
It's been a while since I have had time to make a new tutorial, but as I've had, I think, a few requests for a tutorial for the sunshine cushion which I made at the end of last summer, I thought I'd better try and get on with it! So here's the finished article, as a little reminder. The tutorial follows below for the motif, with some brief instructions for making the cushion cover, because once you know how to make the motif, the rest is really pretty simple.


So, here we go with the motif instructions!
I'm using Rowan Siena cotton 4 ply and a 3mm hook, but any suitable hook and yarn combination will suffice
Step 1: Foundations
Chain 4 and join into a ring by slip stitching into the first chain.
Round 1: Work 12 trebles into the ring.
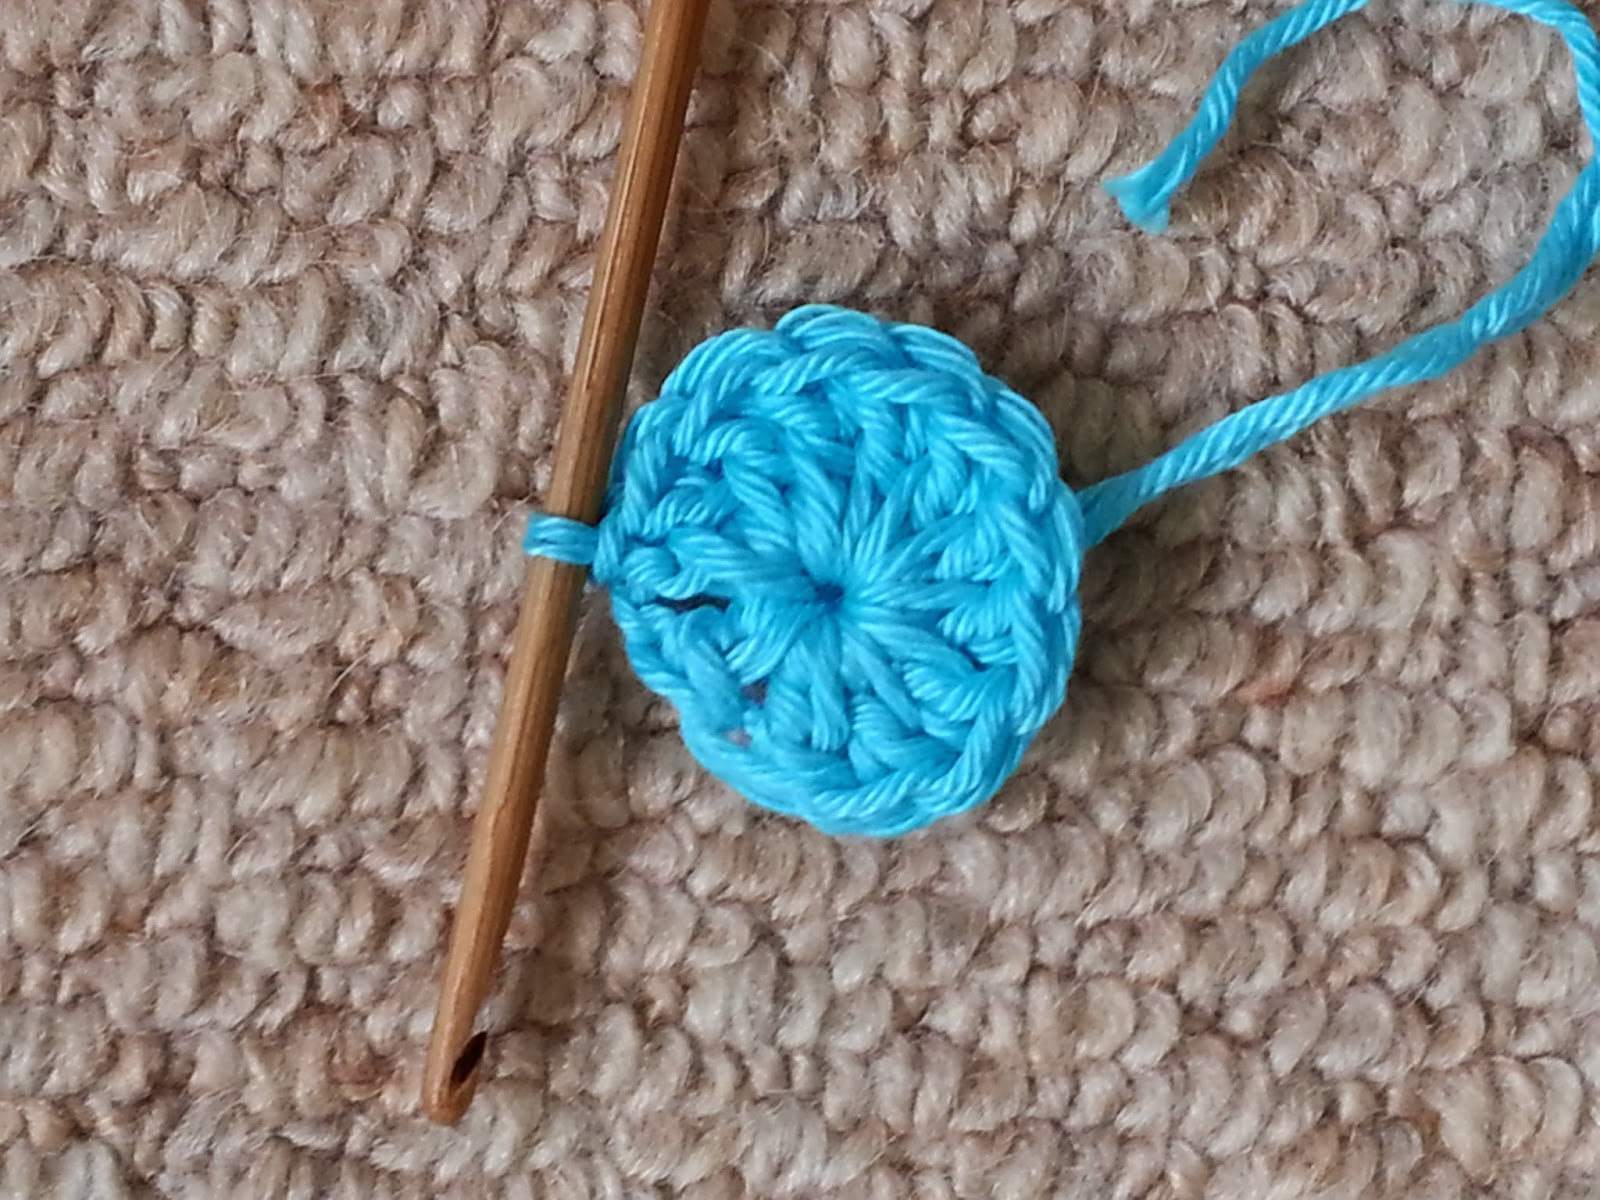
Step 2: Pretty fillet round
In this round you will be working into the tops of the trebles from the previous round.
Start by chaining 5. This counts as your first treble, plus another 2 chain. Work *1 treble into the next stitch, followed by another 2 chain. Repeat from * another 10 times, so that every stitch from the previous round has been worked into. Finish the round by slip stitching into the 3rd of the 5 chain you worked at the start of the round.

You should now have something looking like this:

Step 3: sunshine clusters
In this round you will be working into the 2 chain spaces between trebles created in the last round. You need to work a cluster stitch into each space. Start by slip stitching into the first space next to your hook to move your hook and yarn into position.
Work a 4 treble cluster as follows:
*Yarn round hook, put hook through chain space, yarn round
hook, pull yarn through chain space, yarn round hook, pull through first two loops on hook** (one loop remaining
on hook). Repeat from * to ** noting that with each repeat you will have gained
an extra loop on your hook at the end. Work 5 repeats in total for a 5 treble
cluster. You should now have 5 loops on your hook. To finish the cluster, wrap yarn around hook, and pull through all 5 loops on hook. Chain 3 and create another treble cluster in the next chain space. Continue in this way until a 5 treble cluster has been worked into each 2 chain space from last round, noting that you will chain 3 between each cluster.


Finish the round with a 3 chain, and slip stitch into top of the first treble cluster in the round.

Step 4: Squaring off
Phew, the scary treble cluster stuff is done!
To position your yarn and hook correctly, start by slip stitching into the first of the 3 chain spaces created in the last round. Now, work 4 chain (counts as first double treble), followed by 2 double trebles, 2 chain and 3 double trebles into the same 3 chain space. This forms the first corner of your square. *Work 3 trebles into the next 3 chain space. Repeat from * once more. Into the next 3 chain space work 3 double trebles, 2 chain, 3 double trebles**. Repeat from * to ** 2 times more. Work 3 trebles into each of the next 2 3 chain spaces. Complete round by slip stitching into 4th of 4 chain made at start of round.

That's it! Hopefully you now have something like this:

To make a cushion cover to fit a 16 inch square cushion pad, made 50 motifs (25 for each side). Stitch motifs together into rows of 5 by oversewing the edges of the squares together. Stitch 5 rows of 5 together to form a square for each side. Work 1 round of double crochet around the entire edge of each side. Fasten off loose ends. Holding the two sides with wrong sides facing together and right facing out, double crochet around 3 sides of square, ensuring that your stitches are joining the two sides of the cover. Insert cushion pad. If liked, seal cushion by continuing to double crochet across the fourth side of the cover. Alternatively, for a removable cover, work a series of short 3 chain loops, evenly space along either side of your cover. Use these loops as button holes. and stitch buttons to the other side of the cover to form a closure.
That's all! Hope it works out - please let me know if you have any problems!
xxxxxxxxxxxxxxxxxxxxxxxxxxxxxxxxxxxxxxxxxxx

Gorgeous cushion and motifs. Thank you for sharing your tutorial, I will definitely have a go at these squares, they are so pretty.
ReplyDeleteMarianne x
These are so pretty - I can imagine them in lots of different colour palettes. Thank you x Jane
ReplyDeleteLots of lovely colour! Have a wonderful week xx
ReplyDeleteI do love your cushion Jen and thank you for the pattern - I will get around to using it but I have two blankets been waiting for me to finish for sooooo long I am feeling a bit guilty, one of which is your gorgeous hexi pattern - this may become a cushion instead …….. we'll see! The colours you've chosen for the cushion are wonderful and bright! Hugs, Joy x
ReplyDeleteThank you! I know what you mean though - I have blanket guilt too! I was getting along nicely with concentrating on my current crochet blanket, but then I had to go an spoil it all by starting a new knitted scarf project!
DeleteJen xx
Love your sunshine motif; I may be using it soon, I think it will do very nicely for a Mood Blanket, nice and quick and easy!
ReplyDeleteHave a great week xx Pat
Complimenti per il blog e grazie per il tutorial !
ReplyDeleteMaddalena
Hi Jen, thank you for the tutorial! I only want to double check on one thing before I start making this project... your directions are in UK terminology, correct? I try never to assume as we all know how that goes, lol!
ReplyDeleteHugs from very brrrrrr Harrisville, New Hampshire USA (oh, I am now following you on Bloglovin'!)
Beth P
Hi Beth, nice to meet you! Yes, I am using UK terminology- sorry, I forgot to say.
DeleteHugs back from a very windy rainy Hertfordshire!
Jenx
I love this square! Thank you for sharing your tutorial! I will definitely have to make a few soon!
ReplyDeletethank you for sharing this lovely pattern. i will be having a go at it to cover the naked cushion that is on my settee.
ReplyDeletei was going to ask the same question as beth p about the terminology, is there a way of telling if a pattern is in uk or american terms with out the pattern author actually saying?.thank you for sharing
angie
this is really pretty and i want to try this pattern now! thanks for sharing.
ReplyDeleteHi Jen.
ReplyDeleteI'm going to start with your beautiful cushion. Love this pattern and colors!
Thank you!
I have CADD (Crochet Attention Deficit Disorder - LOL). This will be my next project once I finish my blanket.....
ReplyDeleteTHANK YOU - gorgeous.
:)
what a lovely pattern x x
ReplyDeleteThank you for your tutorial. Very pretty. It is great people like yourself that make it possible to have
ReplyDeletepatterns for us. Thank you
loretta 5/12/16
Lovett, I'm sorry I am not able to give a written pattern or chart just now. However hopefully the photo tutorial above will help you.
DeleteLovett, I'm sorry I am not able to give a written pattern or chart just now. However hopefully the photo tutorial above will help you.
DeleteThank you for sharing your sunshine square tutorial. The cushion is gorgeous. What beautiful colours xx
ReplyDeleteCrochetbyroz.blogspot.co.uk
Thank you for sharing your sunshine square tutorial. The cushion is gorgeous. What beautiful colours xx
ReplyDeleteCrochetbyroz.blogspot.co.uk
Hello, thank you for this beautiful pattern, this is definitely my next project, thank you. Suzanne xx
ReplyDeleteHello, thank you for this beautiful pattern, this is definitely my next project, thank you. Suzanne xx
ReplyDeleteGood article you have managed to write a lot of information regarding the topic. If it is possible can you write some more information about Buy Eco-friendly Cushions Online UK
ReplyDeleteGood job.
ReplyDelete