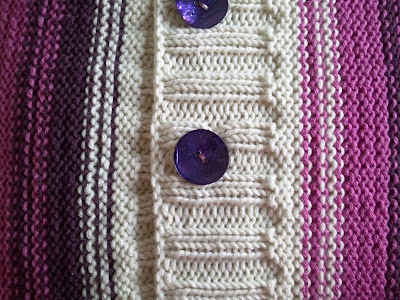
I've been making a stripy cushion cover in aran weight wool cotton. I wanted to try reverse stocking stitch with a stripe pattern. The way the colours are broken up using this just when knitting simple stripes is quite stunning: it reminds me of a sunset.
The cushion fits a 16 inch cushion pad. Here's what I did:
Needles: 4mm for rib band, 4.5mm for main body of cushion
Yarn: Rowan Belle Organic Aran wool cotton:
White: 2 balls
Pink: 2 balls
Aubergine: 2 balls
Front:
Cast on 80 stitches, and knit in stocking stitch in any random stripe pattern you like. The reverse stocking stitch has the best effect in breaking up the colour if you alternate between wide bands of colour and narrow stripes, especially around changing colours. When I wanted to change from one colour to another, I worked as many rows as I liked of colour A, then 1 row of colour B, another 2 rows of colour A then a wide band of colour B again. The point wasn't to plan out how I was going to do the stripes beforehand, I just had fun changing when it seemed right. It was easy to match up the stripes when working the back.
Back: Work 2 pieces for envelope opening.
Piece 1
Cast on 80 stitches working in stripe pattern in reverse stocking stitch so that your work matches the front of your cover. Continue until piece measures approximately 8.5 inches. Using whichever of your three colours you like (I choose white) now work 16 rows of rib as follows:
Row 1 knit 2, purl 2, repeat until end of row. Cast off.
Piece 2
Cast on 80 stitches, working in reverse stocking stitch stripe pattern again, ensuing work matches from of cushion and continue until work measures 8.5 inches. Using the same colour as before, work in rib as before for 8 rows.
Work 5 button holes evenly spaced across rib band by casting off 3 stitches for each button hole. On following row, when you reach the point where you cast off 3 stitches in previous row, wrap yarn around needle 3 times, to make up to correct number of stitches.
Work a further 6 rows in rib, cast off.
Assemble cover and stitch together to form envelope, ensuring that back pieces overlap correctly so that button holes are on the uppermost flap. Stitch on buttons.


No comments:
Post a Comment
I love to read all your comments, so if you have a question to ask or just something to say, please leave me a message and I'll reply!