Showing posts with label motif. Show all posts

Sunday, 9 February 2014

Sunshine motif and cushion - a tutorial

It's been a while since I have had time to make a new tutorial, but as I've had, I think, a few requests for a tutorial for the sunshine cushion which I made at the end of last summer, I thought I'd better try and get on with it! So here's the finished article, as a little reminder. The tutorial follows below for the motif, with some brief instructions for making the cushion cover, because once you know how to make the motif, the rest is really pretty simple.


So, here we go with the motif instructions!

I'm using Rowan Siena cotton 4 ply and a 3mm hook, but any suitable hook and yarn combination will suffice

Step 1: Foundations

Chain 4 and join into a ring by slip stitching into the first chain.

Round 1: Work 12 trebles into the ring.
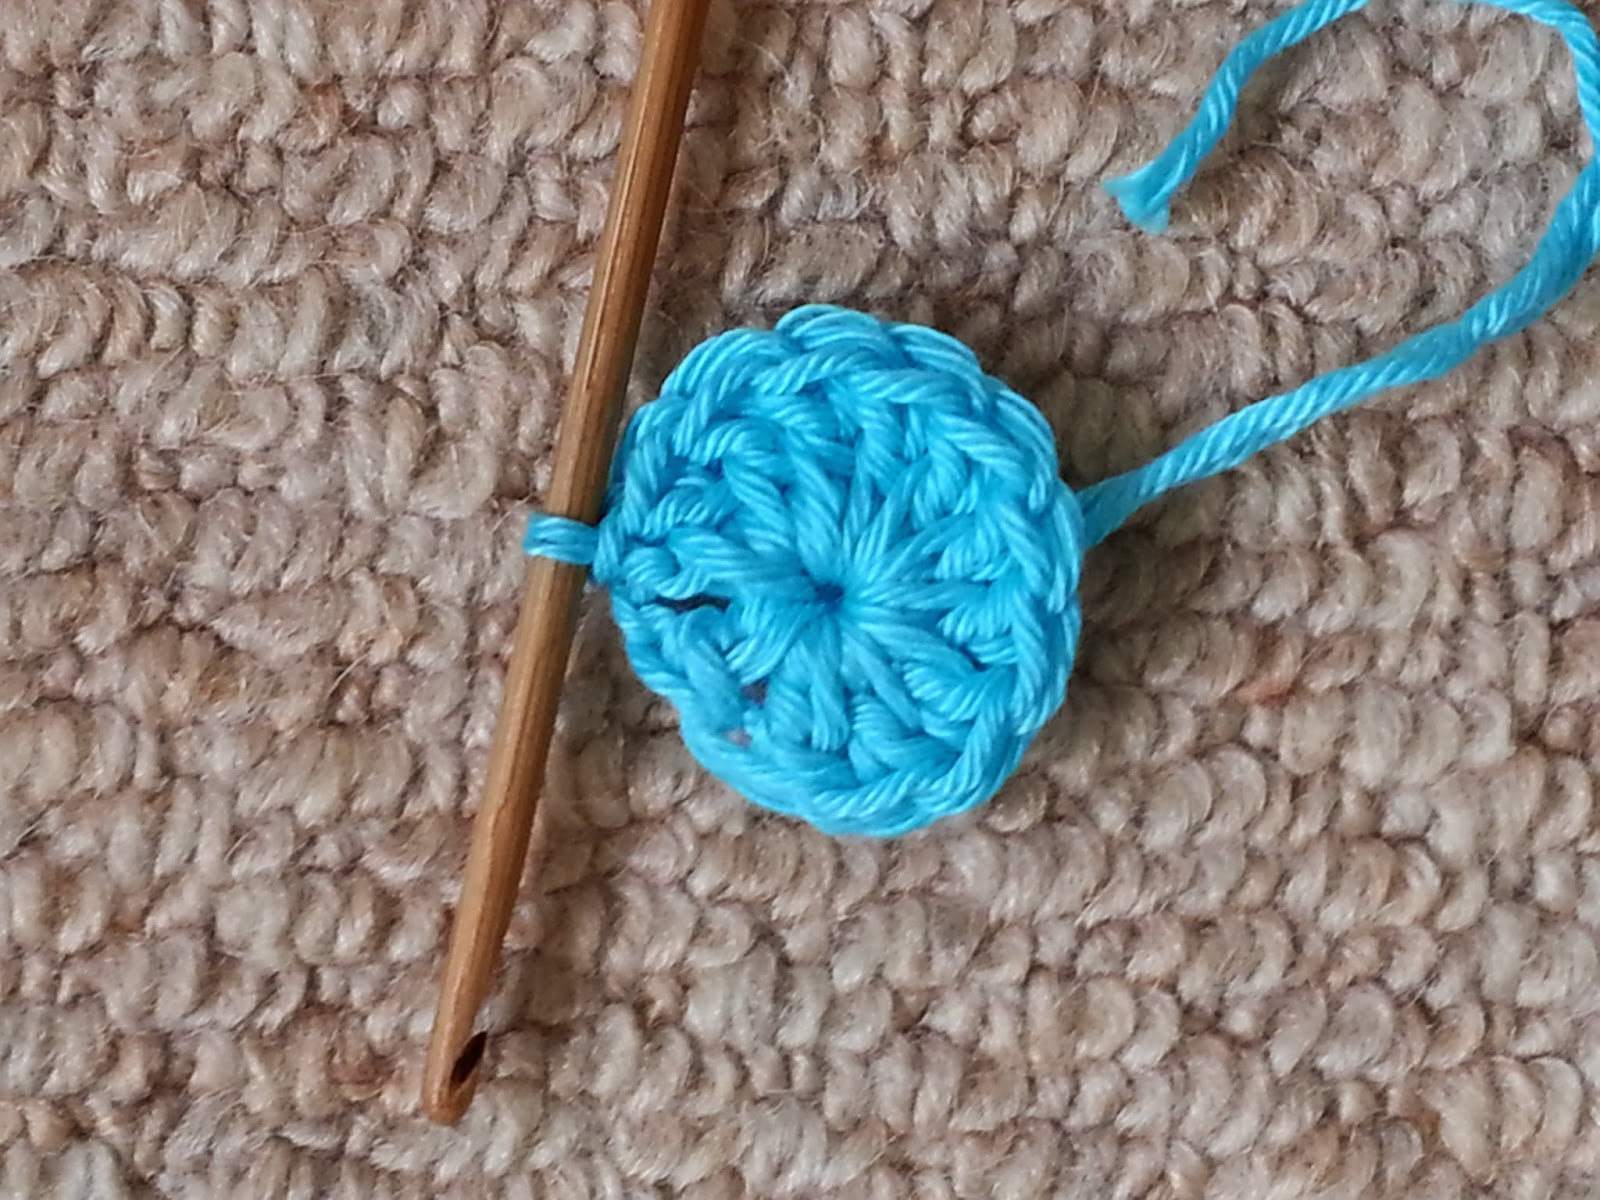

Step 2: Pretty fillet round

In this round you will be working into the tops of the trebles from the previous round. 

Start by chaining 5. This counts as your first treble, plus another 2 chain. Work *1 treble into the next stitch, followed by another 2 chain. Repeat from * another 10 times, so that every stitch from the previous round has been worked into. Finish the round by slip stitching into the 3rd of the 5 chain you worked at the start of the round.


 You should now have something looking like this:


Step 3: sunshine clusters

In this round you will be working into the 2 chain spaces between trebles created in the last round. You need to work a cluster stitch into each space. Start by slip stitching into the first space next to your hook to move your hook and yarn into position. 

Work a 4 treble cluster as follows:
*Yarn round hook, put hook through chain space, yarn round hook, pull yarn through chain space, yarn round hook, pull through first two loops on hook** (one loop remaining on hook). Repeat from * to ** noting that with each repeat you will have gained an extra loop on your hook at the end. Work 5 repeats in total for a 5 treble cluster. You should now have 5 loops on your hook. To finish the cluster, wrap yarn around hook, and pull through all 5 loops on hook. Chain 3 and create another treble cluster in the next chain space. Continue in this way until a 5 treble cluster has been worked into each 2 chain space from last round, noting that you will chain 3 between each cluster.


Finish the round with a 3 chain, and slip stitch into top of the first treble cluster in the round.


 Step 4: Squaring off

Phew, the scary treble cluster stuff is done!

To position your yarn and hook correctly, start by slip stitching into the first of the 3 chain spaces created in the last round. Now, work 4 chain (counts as first double treble), followed by 2 double trebles, 2 chain and 3 double trebles into the same 3 chain space. This forms the first corner of your square. *Work 3 trebles into the next 3 chain space. Repeat from * once more. Into the next 3 chain space work 3 double trebles, 2 chain, 3 double trebles**. Repeat from * to ** 2 times more. Work 3 trebles into each of the next 2 3 chain spaces. Complete round by slip stitching into 4th of 4 chain made at start of round.


That's it! Hopefully you now have something like this:


To make a cushion cover to fit a 16 inch square cushion pad, made 50 motifs (25 for each side). Stitch motifs together into rows of 5 by oversewing the edges of the squares together. Stitch 5 rows of 5 together to form a square for each side. Work 1 round of double crochet around the entire edge of each side. Fasten off loose ends. Holding the two sides with wrong sides facing together and right facing out, double crochet around 3 sides of square, ensuring that your stitches are joining the two sides of the cover. Insert cushion pad. If liked, seal cushion by continuing to double crochet across the fourth side of the cover. Alternatively, for a removable cover, work a series of short 3 chain loops, evenly space along either side of your cover. Use these loops as button holes. and stitch buttons to the other side of the cover to form a closure.

That's all! Hope it works out - please let me know if you have any problems!

xxxxxxxxxxxxxxxxxxxxxxxxxxxxxxxxxxxxxxxxxxx


Follow on Bloglovin

Tuesday, 31 December 2013

Mammoth crafty update part II

Hello again everyone! As promised, here is part II of the mammoth crafty update, a little later than planned. I've been delayed by a chest infection, among other things. I wouldn't be here, blogging, on New Year's Eve (not that there's anything wrong with that), but having asthma and then getting a chest infection is pretty bad news, so I've had to cancel my plans for the evening.

Never mind, at least it gives me time to catch up on my blogging!


One other project I've finished in December was my purple vintage flower cushion.
Here you can see it getting cost with the original cream cushion I made using this pattern.


If you look closely, you'll see a slight difference between the purple and the cream cushions. The purple cushion has several rows of treble crochet bordering each side. This was because I used a 4 ply weight yarn instead of the dk weight used for the cream cushion. I couldn't quite get the shade of pastel lilac I wanted in Rowan Cotton Glace, so I decided to use Rowan Siena instead, and simply modified the pattern slightly. I'm still happy with the result!

***********************************

Well, 2013 is drawing to a close. I have to say it has been a heck of a year for me. Good things and bad, stresses and strains and moments of joy and celebration too. I guess that's like any year, but somehow things have seemed magnified this year. I've finally been able to sort out some long carried personal baggage, with some help from some very supportive people. I have to say that has made a huge difference to me, and I feel I am ending the year as a much stronger person than the person that started the year! Here's just a few of the positives that I've been lucky enough to experience in my personal life in 2013:

  1. Finding out that I had passed the Postgraduate Diploma I took in 2011-12, with merit!
  2. Getting a place on, and starting a PhD course (so far, so good)
  3. Getting my flat! My own space at last - it feels so extravagant to have all this space to myself, and it's only a 1 bedroom flat!
  4. My wonderful, wonderful boyfriend S, who has given me another year full of happy memories and laughter.
  5. My fantastic family (and S again) who have all pitched in and helped me with moving, hefting boxes, doing DIY jobs, providing advice, stopping my tearing my hair out with stress over it all and generally standing on my own 2 feet!
  6. Of course all you fellow bloggers and crafters out there who take the time to read and visit this blog, and leave such kind and supportive comments. Every comment is valued and it's so great to feel part of a community here.


Well, that's all for now folks, the sun has set on 2013, and now we await 2014. I hope to see you all here and on your own blogs in the coming year. Very best wishes and a Happy New Year to you all!

p.s. I have received several requests for patterns recently - I'm not able to respond to them at the moment, but please believe I will do my best to share my makes with you as soon as I can.


Follow on Bloglovin

Wednesday, 7 August 2013

Vintage flower bag

I thought I'd share this little pattern for a bag which I designed over the weekend. Hope you enjoy it!


Materials:

2x balls of Rowan Siena in colour A
2x balls of Rowan Siena in colour B.

2.5 mm hook.


Motif

Notes:
To work a 3 treble cluster:

*Yarn round hook, put hook through chain space, yarn round hook, pull yarn through chain space, yarn round hook, pull through first two loops on hook** (one loop remaining on hook). Repeat from * to ** noting that with each repeat you will have gained an extra loop on your hook at the end. Work 3 repeats in total for a 3 treble cluster, and work 5 repeats in total for a 5 treble cluster.

Motif instructions

Chain 4, join into a ring using a slip stitch.

Round 1: Chain 5 (forms first treble and 2 chain). Working into the centre of the ring work *1 treble, chain 2 – repeat from * 4 times more. End by slip stitching into 3rd of 5 chain worked at start of round. You should now have 6 chain spaces.

Round 2: Work 1 *3 treble cluster, 3 chain, 1 3 treble cluster into first chain space (so you’re working 2 treble clusters into each of the 6 chain spaces). Chain 3 repeat from * to end of round, ending with a 3 chain and slip stitch into top of first 3 treble cluster

Round 3: Work 1 *5 treble cluster into first chain space. Chain 5, repeat from * to end of round, working 1 5 treble cluster into each chain space. End round with 5 chain and slip stitching into top of first 5 treble cluster of the round.

Round 4: Chain 4 into first chain space. Continuing to work in 1st chain space, work 2 double trebles, 2 chain, 4 double trebles. This forms the first corner of the motif. *Work 4 trebles into next chain space, then 4 trebles into next chain space. Work 4 double trebles, 2 chain, 4 double trebles into next chain space. Repeat from to end of round. Finish round by slip stitching into top of 4 chain from start of round.

Make 6 motifs for each bag panel.

Making up body of bag
Double crochet edges of motifs together to join to form a square. When you have joined enough motifs to form the first side, work a round of double crochet around the entire edge of that side. 

Work 2 rows of treble crochet across one edge – this will form the opening edge of the bag.

Repeat the process on the motifs for the second side of the bag.
To join the 2 sides to form the body of the bag, holding the two sides together with wrong sides facing inwards, double crochet the sides together around three of the edges (the fourth edge of left open). 

Work 1 row of double crochet around the opening of the bag. 

Handles – make 2

Chain 121. Work 1 dc in 2nd chain from hook. Work 1 dc into each chain to end. Chain 1 and turn. Work a further 5 rows of dc then fasten off.

Attach the handles to the bag inside the opening.


Tuesday, 21 May 2013

Sometimes life gets in the way of blogging (but not craft!)

Any regular visitors to this blog know that I usually aim to post about once a week. However, I don't like to post if I feel like I don't really have anything to say, or anything new to share with you.


I think I mentioned on a recent post that I had been having some tough times in the last few weeks. Well, that made me feel like I just didn't have the energy to post. But, I'm lucky enough to have some tremendously supportive people in my life and I'm already feeling much better. As I have probably said many times before here, I always find crochet and knitting to be a soothing distraction from whatever is troubling me.


So, as well as finishing my pastel throw I have been working on a new hexagon blanket. I don't want to make this post too long, so I'll save full details for another time. The pictures above show a sneak peek!

On Sunday, I finally managed to finish my pastel hexagon throw, and posted a pattern for this, which some of you may have seen already. Some of you lovely readers have been kind enough to post some very positive comments already. Thank you so much for those comments - they really do mean a lot to me. It feels great to know that other people can get enjoyment and inspiration from the things I post here. 

Comments are aso great, as they make you feel part of a community - and that was really why I started blogging!

Now, my lack of energy and stress has sadly also meant that I haven't stopped by any of my own favourite blogs for a while. Well, I'm going to try and remedy that today! I have a lovely day off work today, though so look out, I may be stopping by your blog and leaving you an admiring comment or two!

One final word - I wanted to share with you the glorious, gorgeous yarn bundle that has just arrived in the post!


Stay happy, and keep on crocheting!

xx xxx xx xxx xx xxx xx xxx xx xxx xx

 
Follow on Bloglovin

Sunday, 19 May 2013

Evie: Pastel hexagon throw pattern

Finally I've been able to finish this project (it feels like it has taken ages!), and I'm now able to share the pattern and instructions with you!


Materials

4mm crochet hook
DK weight yarn in the following quantities and colours:

For centres of motifs (use one colour per motif)
3x dark purple
3x lilac
3x pale pink
3x rose pink
3x duck egg
3x airforce blue
3x pale blue
3x fudge

For edge of motifs (each motif is edged in cream)
7 x cream 


The yarns I used we Sublime Extra Fine Merino, Sublime Baby Cashmere Merino Silk, Debbie Bliss Cashmerino DK and Rowan Cashsoft DK. Sadly some of these lovely yarns (the Rowan and Debbie Bliss) are now being discontinued, so I don't recommend any specific shades. I've given the colours above as a rough guide to the shades used should you want to make a throw with the same colour effect as my own. However one of the great things about crochet is the endless possibility to be creative with colour, so I'm sure you will want to pick your own colours for a unique effect!

Instructions for making hexagon motif

Make 142 motifs to create a throw measuring approx. 43 inches wide x 60 inches in length.


Using any of the 8 colours you have chosen, chain 4 then join into a ring by slip stitching into the first chain.

Round 1: Chain 3 (counts as your first stitch), then working into the centre of the ring you have made, work 1 treble, *2 chain, 2 treble. Repeat from * 4 times more. Finish round by slip stitching into the top of the 3 chain from the start of the round. You should have 6 2 chain spaces and 6 clusters of 2 trebles.

Round 2: Chain 3 (counts as your first stitch), *work 1 treble into top of next stitch, then work 1 treble, 2 chain, 1 treble into 2 chain space from previous round. Repeat from * 4 times more. Work 1 treble into top of next stitch, then 1 treble into 2 chain space, then 2 chain. Finish round by slip stitching into the top of the 3 chain made at tha start of the round.

Round 3: Chain 3 (counts as your first stitch). *Work 1 treble into top of each of next 2 stitches then work 1 treble, 2 chain, 1 treble into 2 chain space from previous round. *Work 1 treble into top of next 3 stitches, then work 1 treble, 2 chain, 1 treble into next 2 chain space. Repeat from * 4 times more. Finish round by slip stitching into top of 3 chain from start of round.

Round 4: Chain 3 (counts as your first stitch). *Work 1 treble into top of each of next 3 stitches, then work 1 treble, 2 chain, 1 treble into 2 chain space from previous round. *Work 1 treble into top of next 4 stitches, then work 1 treble, 2 chain, 1 treble into next 2 chain space. Repeat from * 4 times more, then work 1 treble into top of last remaining stitch in round. Finish round by slip stitching into top of 3 chain from start of round.

Round 5: Change to cream for edge of motif. Join the new colour in in one of the 6 two chain spaces in your hexagon, using a 3 chain for your first stitch, then *work 1 treble into each stitch along the first side of your hexagon. On reaching the next chain space work 1 treble, 2 chain, 1 treble into chain space. Repeat from *5 times more until the entire hexagon has been edged in cream, finishing the round by working 1 treble, 2 chain into last chain space (same chain space in which you began the round) and slip stitching into the top of the 3 chain at the start of the round to complete.

Arrange your motifs in rows, alternating between 9 in one row and 10 in the next, using the pictures as a guide. Ensure that you do not place to motifs of the same colour next to each other.

Stitch the motifs together in rows by oversewing the edges of motifs together using the cream yarn. Sew the rows together so that your hexagons tesselate.

Weave in any loose ends on reverse.

xx xxx xx xxx xx xxx xx xxx xx

If you try making this I hope you enjoy it. If you have any questions or anything is unclear in the pattern, please let me know by leaving a comment on this post.

Follow on Bloglovin


Wednesday, 5 September 2012

Starburst hexagons

A few days ago I hinted at an idea I had for a new crochet project (after finishing my ripple throw).

Maybe you remember that I felt inspired by our woodpile of all things (and here it is in all its glory - hmm actually looking forward to cold weather so I can snuggle in front of the fire)!


Well, now I can share a little peek:


Hmm these aren't the best pictures looking at them. I've just upgraded to a whizzy new phone and I've taken to snapping making pics using that - obviously I haven't quite got the hang of holiding it steady while I snap!

Anyway, these hexagons are just a modification of the starburst square - just worked the last round into 6 sides instead of 4.

Not sure how big this throw will get as I am not planning on buying a lot of new yarn for it (ah who am I kidding, its bound to happen!). I'll see how I go.