Hi everyone, I'm back after a week or so break, where I have been studying hard and enjoying some uninterrupted time (for a change) with S.
The two of use headed off to Thetford for a week away to enjoy the country side in autumn. For any one reading this who may not be so familiar with English geography, Thetford is a little market town near the Norfolk/Suffolk border in a region of England called East Anglia. I believe the region name of East Anglia is derived from the settlement in that area of a people who called themselves the 'Angles'. The Angles were a Germanic tribe that settled in what's now England after the Roman period. More info on Wikipedia in case anyone is interested (personally I love history almost as much as I do crafts!).
We spent a day tramping around Thetford forest, which despite being relatively new is quite lovely.
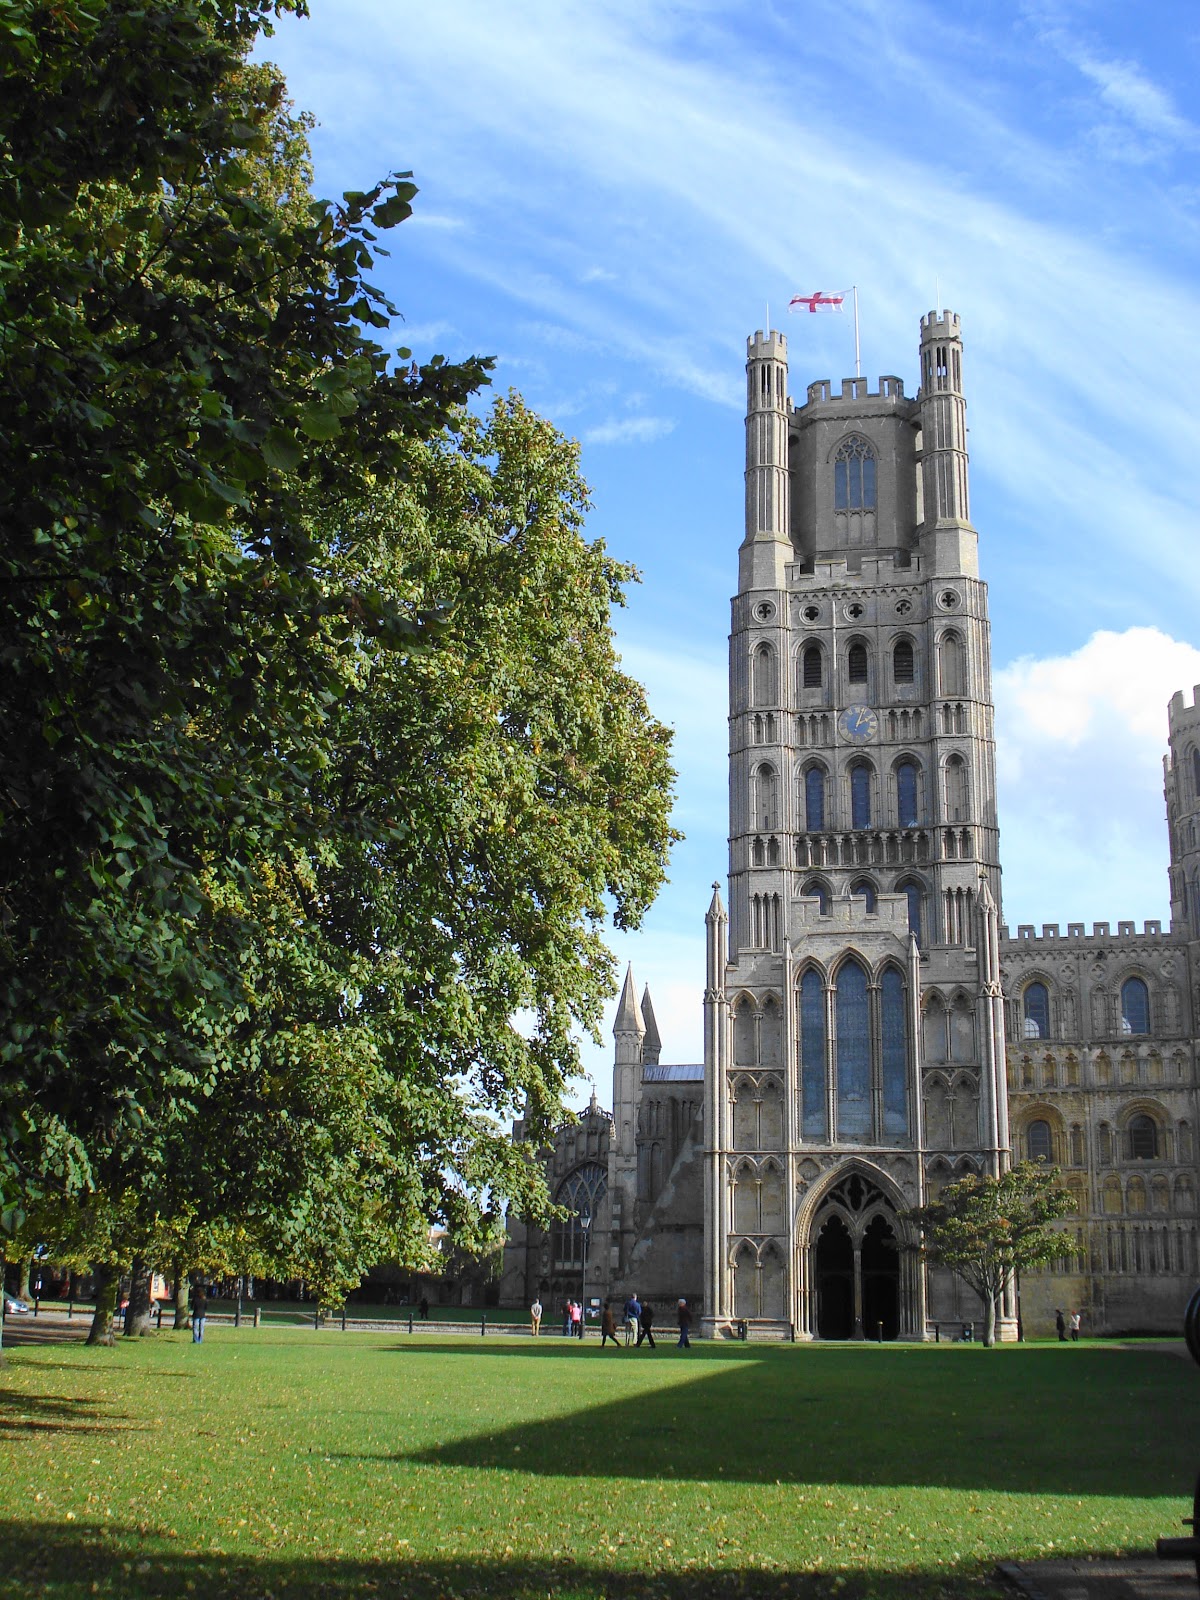
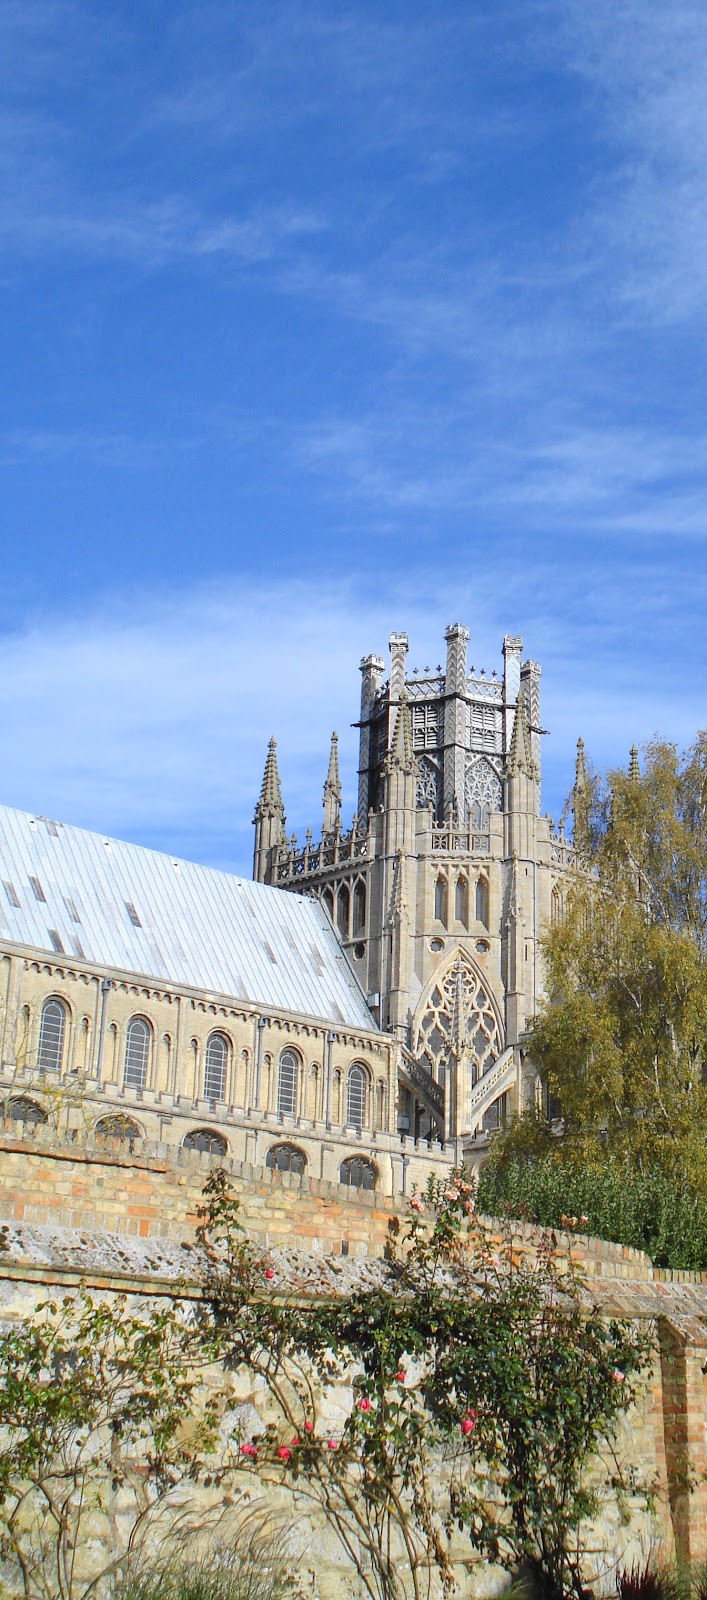
We also visited the nearby City of Ely for two days - a lovely place, with a wonderful Cathederal. The City is really something special - nestled near the Catherdral there is one of the largest surviving collections of medieval buildings in Europe. It is such an atmospheric place.
Whenever I visit somewhere where there is a cathederal or castle this impressive it always makes me feel so lucky to live in a country where these sorts of buildings are so numerous and open to visitors all year round.
Well, I think that's enough of the history and geography lesson for today! I'm hoping to find time for another post tomorrow - this time more craft related!
Take care! xx
Saturday, 20 October 2012
Thursday, 11 October 2012
Hexagon throw is coming along!
Despite much time studying I am still managing a bit of crochet when I can. Sometimes only a couple of motifs a night, but that's ok.
Prima magazine has brought out a Christmas craft magazine- so many cute things I want to make! Hopefully I will have some time to blog about it soon.

Prima magazine has brought out a Christmas craft magazine- so many cute things I want to make! Hopefully I will have some time to blog about it soon.
Sunday, 7 October 2012
Collecting, crocheting and boxie pouches
It has been a heck of a week again for me with my coursework, and that's why its been a little quiet on here lately. I have so much studying to do I don't have much time at all for crafting. Sad, but necessary until the end of November, which isn't long now.
So, this is a bit of a round up of what I have been doing in the last couple of weeks. I normally would split this over a few posts, but I'm condensing due to lack of time!
It feels like ages ago since I first posted on here that I was attempting this. Well, I'm still working on it, though progress feels slow!
I'm taking a modular approach now - rather than making rows and sewing them on one at a time, I'm making clusters of hexagons as kind of modules then fitting them together.
I discovered a sewing tutorial for these boxie pouches a couple of weeks ago and have since made 2 pouches - I love them! Once you get the hang of it, they are so quick and easy to make. I think every lady and possible all females work colleagues will be getting one of these for Christmas this year!
So, this is a bit of a round up of what I have been doing in the last couple of weeks. I normally would split this over a few posts, but I'm condensing due to lack of time!
Crochet hexagon blanket
It feels like ages ago since I first posted on here that I was attempting this. Well, I'm still working on it, though progress feels slow!
I'm taking a modular approach now - rather than making rows and sewing them on one at a time, I'm making clusters of hexagons as kind of modules then fitting them together.
Collecting china
I spotted some lovely cups and saucers on eBay the other week, and had to have them! They are Elizabethan Carnaby - I just love the retro floral pattern and colours on them. They have pride of place on the dresser at the moment. I'm afraid the colours don't show up so well in a photo. I think may favourite is the turquoise purple mix (bottom), though I like the autumnal feel of the orange, yellow and amber mix too (second from bottom)!Boxie pouches
I discovered a sewing tutorial for these boxie pouches a couple of weeks ago and have since made 2 pouches - I love them! Once you get the hang of it, they are so quick and easy to make. I think every lady and possible all females work colleagues will be getting one of these for Christmas this year!
Labels:
china,
collecting,
crochet,
sewing
Sunday, 30 September 2012
Marmalade scarf
I thought I would share with you a pattern for a crochet scarf that I have devised. I'm calling it the Marmalade scarf - because of the colours its worked in.
As the year starts to turn here in the UK, and autumn arrives I always get drawn to those really rich autumn leaf colours - gold, red, and orange tones. I wanted to make a scarf inspired by those kinds of colours, and the Marmalade scarf was the result! This scarf is worked lengthways, in striped bands of Kid Classic and Kidsilk Haze yarn. This pattern is also available from Ravelry.
Here's how I did it:
Materials:
2x balls of Rowan Kid Classic shade Ochre 881
1x ball of Rowan Kidsilk Haze shade Marmadlade 596
1x ball of Rowan Kidsilk Haze shade Fudge 658
1x ball of Rowan Kidsilk Haze shade Ember 644
6mm crochet hook
5mm crochet hook
Notes: this pattern uses UK crochet abbreviations. The pattern also requires you to work some rows using 2 strands of the same colour of Kidsilk Haze held together to double the thickness. You may find it easier to wind half the ball off into a separate ball before you start, for each of the Kidsilk Haze colours you use. This pattern is worked using a slightly larger hook size than suggested for the yarn, to give a very open, soft, airy scarf.
Using Kid Classic yarn and 6mm hook, loosely make a chain of 203.
Row 1: Work 1 treble into 3rd chain from hook. Continue working 1 treble into each chain until end.
Row 2: Chain 3 (counts as first stitch), skip first treble in row (becuase you already made your first stitch using the 3 chain), and work 1 treble into top of each stitch to end of row (you now have 2 rows of simple treble crochet).
Row 3: Change to the first of your shades of Kidsilk Haze. Holding the yarn double (see notes), work 4 chain (counts as first stitch and 1 chain). Skip first 2 trebles. Work 1 treble into next stitch, *then work 1 chain, skip next treble and work 1 treble into following stitch. Repeat from * to end of the row - you should end the row by working 1 treble into the last stitch of the row. You have now created a series of 1 chain spaces along the length of your scarf.
Row 4: Chain 3. *Work 2 treble into 1 chain space created in last row. Repeat from * to end of row, so that you work 2 trebles into every 1 chain space created in last row, running along the entire length of the scarf. Finish row by working 1 treble into top of the last treble stitch, to keep row end looking neat and even. You now have a series of clusters of 2 treble stitches along the row.
Row 5: Chain 4 (counts as first stitch plus 1 chain). Work 1 treble in between the first groups of 2 trebles from last row (note - your first group of trebles in the row will actually be 3 trebles instead of 2 because of the extra treble worked at the end of row 4.). *Chain 1, work 1 treble in-between the next 2 clusters of 2 trebles. Repeat from * to end of row, working your last treble into the top of last stitch in the row.
Row 6: Change back to Kid Classic yarn. Chain 3 (counts as first stitch), work 1 treble into top of each 1 chain and 1 treble into top of each treble from previous row, so that you switch back to another row of plain treble stitch.
Rows 7 - 10: Repeat rows 3 - 6 once more, using a different colour of Kidsilk Haze held double for rows 7-9.
Rows 11 - 14: Repeat rows 3 - 6 once more, using a different colour of Kidsilk Haze held double for rows 11-13.
Row 15. Chain 3 (counts as first stitch). Work 1 treble into each stitch to end of row. You should have finished with another 2 rows of simple treble stitch. Fasten off.
Making up
To tidy up ends of scarf work 2 rows of double crochet along short ends of scarf, using 5mm hook and Kid Classic yarn. You should work about 34 double crochet stitches evenly along each short end of the scarf, but it doesn't matter if you have slightly more or less stitches.
As the year starts to turn here in the UK, and autumn arrives I always get drawn to those really rich autumn leaf colours - gold, red, and orange tones. I wanted to make a scarf inspired by those kinds of colours, and the Marmalade scarf was the result! This scarf is worked lengthways, in striped bands of Kid Classic and Kidsilk Haze yarn. This pattern is also available from Ravelry.
Here's how I did it:
Materials:
2x balls of Rowan Kid Classic shade Ochre 881
1x ball of Rowan Kidsilk Haze shade Marmadlade 596
1x ball of Rowan Kidsilk Haze shade Fudge 658
1x ball of Rowan Kidsilk Haze shade Ember 644
6mm crochet hook
5mm crochet hook
Notes: this pattern uses UK crochet abbreviations. The pattern also requires you to work some rows using 2 strands of the same colour of Kidsilk Haze held together to double the thickness. You may find it easier to wind half the ball off into a separate ball before you start, for each of the Kidsilk Haze colours you use. This pattern is worked using a slightly larger hook size than suggested for the yarn, to give a very open, soft, airy scarf.
Using Kid Classic yarn and 6mm hook, loosely make a chain of 203.
Row 1: Work 1 treble into 3rd chain from hook. Continue working 1 treble into each chain until end.
Row 2: Chain 3 (counts as first stitch), skip first treble in row (becuase you already made your first stitch using the 3 chain), and work 1 treble into top of each stitch to end of row (you now have 2 rows of simple treble crochet).
Row 3: Change to the first of your shades of Kidsilk Haze. Holding the yarn double (see notes), work 4 chain (counts as first stitch and 1 chain). Skip first 2 trebles. Work 1 treble into next stitch, *then work 1 chain, skip next treble and work 1 treble into following stitch. Repeat from * to end of the row - you should end the row by working 1 treble into the last stitch of the row. You have now created a series of 1 chain spaces along the length of your scarf.
Row 4: Chain 3. *Work 2 treble into 1 chain space created in last row. Repeat from * to end of row, so that you work 2 trebles into every 1 chain space created in last row, running along the entire length of the scarf. Finish row by working 1 treble into top of the last treble stitch, to keep row end looking neat and even. You now have a series of clusters of 2 treble stitches along the row.
Row 5: Chain 4 (counts as first stitch plus 1 chain). Work 1 treble in between the first groups of 2 trebles from last row (note - your first group of trebles in the row will actually be 3 trebles instead of 2 because of the extra treble worked at the end of row 4.). *Chain 1, work 1 treble in-between the next 2 clusters of 2 trebles. Repeat from * to end of row, working your last treble into the top of last stitch in the row.
Row 6: Change back to Kid Classic yarn. Chain 3 (counts as first stitch), work 1 treble into top of each 1 chain and 1 treble into top of each treble from previous row, so that you switch back to another row of plain treble stitch.
Rows 7 - 10: Repeat rows 3 - 6 once more, using a different colour of Kidsilk Haze held double for rows 7-9.
Rows 11 - 14: Repeat rows 3 - 6 once more, using a different colour of Kidsilk Haze held double for rows 11-13.
Row 15. Chain 3 (counts as first stitch). Work 1 treble into each stitch to end of row. You should have finished with another 2 rows of simple treble stitch. Fasten off.
Making up
To tidy up ends of scarf work 2 rows of double crochet along short ends of scarf, using 5mm hook and Kid Classic yarn. You should work about 34 double crochet stitches evenly along each short end of the scarf, but it doesn't matter if you have slightly more or less stitches.
Labels:
accessories,
crochet,
scarf
Friday, 21 September 2012
Crochet out of control
The other day I had a little look around at all the various projects which I have started in the last few weeks and stashed in various places, and realised something - its getting out of control!
So, time for a little reality check, which is what this post is all about. I have:
1. Ripple throw
This uses Rowan Pure Wool DK, and I started it after randomly deciding last weekend that I needed to be working on another Ripple Throw! This one is supposed to be more autumnal colours to go with the changing season here. It uses colours
051 Gold
019 Avocado
026 Hyacinth
007 Cypress
052 Orchid
2. Starburst Hexagon Throw
I also still have my lovely hexagon throw to work on. I've now put the pattern up here and on Ravelry in case anyone else would like to try - I've spotted one person already who has! I hope it works out. Its really putting me to shame as I still have a long way to go on mine! Here is it so far:
I'll put up details of the colours used here when its finished - there's too many to count right now!
3. Lace flower afghan
I'm calling this an afghan, but to be honest I'm not sure that it will get that big. The lace flower pattern is something I designed myself this week. It sort of reminds me of the Ariel washing powder logo! Anyway, I'm worried they may be a little too flimsy for a throw, but maybe I can turn it into a bed runner instead. If anyone has suggestions for what this could be, I'd love to hear!
The yarn used is Debbie Bliss Baby Cashmerino in colours:
051 Gentian
060 Hot Pink
600 Light Pink
069 Lilac Pink
4. Rainbow hexagon throw
Inspired by a beautiful throw I have seen this week on the MeMe Rose blog, I wanted to make a throw using hexagons in one colour arranged in a rainbow order so they look like they are fading through each other. So far, I have a small pile of hexagons, but I plan for this to be my main project over the weekend, so I may have more snaps of it to share with you next week when it has grown a little!
I'm using Stylecraft Special DK for this, which is 100% acrylic. Normally, I have to confess, I am a bit of a yarn snob, and tend to want to stick with natural fibres like wool or cotton. However, with the amount of crochet and throw making I have done lately, the spend was starting to get a little out of control! Also I had seen a couple of projects on other blogs (not least the MeMe Rose project mentioned above, but also a throw on the Sandra's Cherry Heart Blog) using this yarn, and thought the colours looked beautiful! So, I'm giving acrylic a try and so far, I have been really pleasantly surprised! The colours look as lovely in real life as they do in pictures, and the feel of the yarn is soft, but with a nice weight feeling too!
Full details of the colours I'm using for this when its done, but here's a little taster of some of them:
Wow, so that's the end of the reality check for today! I probably have other small projects stashed away in the cupboard that I have forgotten about too. So, I am officially not allowed to start anything else until I finish at least 2 of these projects. Hmmm, we'll see how long that resolution lasts.....
Wishing you a lovely weekend!
So, time for a little reality check, which is what this post is all about. I have:
1. Ripple throw
This uses Rowan Pure Wool DK, and I started it after randomly deciding last weekend that I needed to be working on another Ripple Throw! This one is supposed to be more autumnal colours to go with the changing season here. It uses colours
051 Gold
019 Avocado
026 Hyacinth
007 Cypress
052 Orchid
2. Starburst Hexagon Throw
I also still have my lovely hexagon throw to work on. I've now put the pattern up here and on Ravelry in case anyone else would like to try - I've spotted one person already who has! I hope it works out. Its really putting me to shame as I still have a long way to go on mine! Here is it so far:
I'll put up details of the colours used here when its finished - there's too many to count right now!
3. Lace flower afghan
I'm calling this an afghan, but to be honest I'm not sure that it will get that big. The lace flower pattern is something I designed myself this week. It sort of reminds me of the Ariel washing powder logo! Anyway, I'm worried they may be a little too flimsy for a throw, but maybe I can turn it into a bed runner instead. If anyone has suggestions for what this could be, I'd love to hear!
The yarn used is Debbie Bliss Baby Cashmerino in colours:
051 Gentian
060 Hot Pink
600 Light Pink
069 Lilac Pink
4. Rainbow hexagon throw
Inspired by a beautiful throw I have seen this week on the MeMe Rose blog, I wanted to make a throw using hexagons in one colour arranged in a rainbow order so they look like they are fading through each other. So far, I have a small pile of hexagons, but I plan for this to be my main project over the weekend, so I may have more snaps of it to share with you next week when it has grown a little!
I'm using Stylecraft Special DK for this, which is 100% acrylic. Normally, I have to confess, I am a bit of a yarn snob, and tend to want to stick with natural fibres like wool or cotton. However, with the amount of crochet and throw making I have done lately, the spend was starting to get a little out of control! Also I had seen a couple of projects on other blogs (not least the MeMe Rose project mentioned above, but also a throw on the Sandra's Cherry Heart Blog) using this yarn, and thought the colours looked beautiful! So, I'm giving acrylic a try and so far, I have been really pleasantly surprised! The colours look as lovely in real life as they do in pictures, and the feel of the yarn is soft, but with a nice weight feeling too!
Full details of the colours I'm using for this when its done, but here's a little taster of some of them:
Wow, so that's the end of the reality check for today! I probably have other small projects stashed away in the cupboard that I have forgotten about too. So, I am officially not allowed to start anything else until I finish at least 2 of these projects. Hmmm, we'll see how long that resolution lasts.....
Wishing you a lovely weekend!
Labels:
afghan,
crochet,
hexagon motif,
projects,
reality check,
ripple stitch,
throw
Sunday, 16 September 2012
Sew Sunday
Today has been a sewing day. If you look through the past posts on this blog, you'll see I'm not much for sewing - more of a crocheter and knitter.
However, I have been wondering for a while about the pull through method of lining a bag (I think that's what its called anyway!). That's where, in order to get a nice neat zipped bag or pouch, you leave a small gap in the lining fabric at the bottom, and pull the exterior out through that gap. Sounds weird doesn't it? Well I always thought so too, but today I plucked up some courage and gave it a go, and to my suprise, it works brilliantly!
I made a little simple zip up purse - no gusset or sides - I have yet to figure out how to do those well! As you may be able to tell, the zip is a little wonky, but I'm pretty proud of it. This was inspired by a tutorial I found on Pinterest for a box pouch. I wasn't brave enough for the box pouch, but maybe next time! I'm also thinking, crochet purse with fabric lining using this method.
But, the big thing I made today was a fabric tote bag, for carting my bigger crochet and knitting projects around the house. I'm actually pretty proud of this - I actually managed to get the seams on the lining and outer fabric to line up pretty closely, and I'm usuallu rubbish at those kinds of details!
Its sort of reversible if you look at the way the fabrics are arranged - opposing fabrics for the sides and gusset on the lining and out, if you see what I mean.
The fabrics I used for both the tote and the purse were Amy Butler Gypsy Caravan - Almond Velvet Vine and Mocha Hammock Stripe
Well, I'm not sure when I'll be back here - studying is really kicking in now, and its tough going! Data analysis using Excel (sigh - not something I'm good at it turns out!). I'll try and keep up at least one post a week though.
Wherever you are, have a lovely evening and a great week!
However, I have been wondering for a while about the pull through method of lining a bag (I think that's what its called anyway!). That's where, in order to get a nice neat zipped bag or pouch, you leave a small gap in the lining fabric at the bottom, and pull the exterior out through that gap. Sounds weird doesn't it? Well I always thought so too, but today I plucked up some courage and gave it a go, and to my suprise, it works brilliantly!
I made a little simple zip up purse - no gusset or sides - I have yet to figure out how to do those well! As you may be able to tell, the zip is a little wonky, but I'm pretty proud of it. This was inspired by a tutorial I found on Pinterest for a box pouch. I wasn't brave enough for the box pouch, but maybe next time! I'm also thinking, crochet purse with fabric lining using this method.
But, the big thing I made today was a fabric tote bag, for carting my bigger crochet and knitting projects around the house. I'm actually pretty proud of this - I actually managed to get the seams on the lining and outer fabric to line up pretty closely, and I'm usuallu rubbish at those kinds of details!
Its sort of reversible if you look at the way the fabrics are arranged - opposing fabrics for the sides and gusset on the lining and out, if you see what I mean.
The fabrics I used for both the tote and the purse were Amy Butler Gypsy Caravan - Almond Velvet Vine and Mocha Hammock Stripe
Well, I'm not sure when I'll be back here - studying is really kicking in now, and its tough going! Data analysis using Excel (sigh - not something I'm good at it turns out!). I'll try and keep up at least one post a week though.
Wherever you are, have a lovely evening and a great week!
Saturday, 15 September 2012
Crochet starburst hexagon pattern tutorial
I've wanted to try and post a tutorial for this motif for a while, and now I've been able to take some photos to accompany it, so here we go! This is what I am using to make my hexagon throw.
Starburst hexagon
Materials: Rowan Pure Wool DK in 4 different colours (I used shade 026 Hyacinth, shade 025 Tea Rose, shade 037 Port and shade 052 Orchid - my favourite shades at the moment).
4.00mm crochet hook
Using colour A, chain 4 and join into a ring with a slip stitch.
Round 1: chain 3 (counts as first stitch) and work 11 trebles into ring. Finish round by slip stitching into top of 3 chain from start of round. Fasten off colour A.
Round 2: Join in colour B, joining yarn into one of the spaces between two of the stitches from round 1 (it doesn't matter which space you use). Chain 3 (counts as first stitch), work 1 treble into same space, then work 2 trebles into each of the spaces between the stitches from round 1. You should have 24 stitches at the end of the round (12 groups of 2 stitches). Finish by slip stitching into top of 3 chain from start of round. Fasten off colour B.
Round 3: Join in colour C, again joining yarn into one of the spaces between the groups of trebles from round 2. Work 3 chain (counts as first stitch), then work 2 trebles into the same space. Into each remaining space between the pairs of stitches from the last round, work 3 trebles. You should have 36 stitches at the end of the round (12 groups of 3 stitches). Finish round by slip stitching into top of 3 chain from start of round. Fasten off colour C.
Round 4: Join in colour D, joining yarn into one of the spaces between the groups of trebles from round 3. Work 3 chain (counts as first stitch), then work 2 trebles into the same space. *Work 3 trebles into next space, then 3 trebles, 2 chain 3 trebles into next space to make the first corner of your hexagon. Repeat from * 4 more times. Work 3 trebles into next space, then 3 trebles 2 chain into last space (which will be the same space which you worked into at the start of the round. Slip stitch into top of 3 chain from the start of the round to complete, and fasten off.
And there you have it (I hope!). A nice little hexagon which you can now use for whatever takes your fancy: cushions, throws, bags - the only limit is your imagination. Sadly with me my imagination seems a little limited at the moment, so I'm making a throw!
Starburst hexagon
Materials: Rowan Pure Wool DK in 4 different colours (I used shade 026 Hyacinth, shade 025 Tea Rose, shade 037 Port and shade 052 Orchid - my favourite shades at the moment).
4.00mm crochet hook
Using colour A, chain 4 and join into a ring with a slip stitch.
Round 1: chain 3 (counts as first stitch) and work 11 trebles into ring. Finish round by slip stitching into top of 3 chain from start of round. Fasten off colour A.
Round 2: Join in colour B, joining yarn into one of the spaces between two of the stitches from round 1 (it doesn't matter which space you use). Chain 3 (counts as first stitch), work 1 treble into same space, then work 2 trebles into each of the spaces between the stitches from round 1. You should have 24 stitches at the end of the round (12 groups of 2 stitches). Finish by slip stitching into top of 3 chain from start of round. Fasten off colour B.
Round 3: Join in colour C, again joining yarn into one of the spaces between the groups of trebles from round 2. Work 3 chain (counts as first stitch), then work 2 trebles into the same space. Into each remaining space between the pairs of stitches from the last round, work 3 trebles. You should have 36 stitches at the end of the round (12 groups of 3 stitches). Finish round by slip stitching into top of 3 chain from start of round. Fasten off colour C.
Round 4: Join in colour D, joining yarn into one of the spaces between the groups of trebles from round 3. Work 3 chain (counts as first stitch), then work 2 trebles into the same space. *Work 3 trebles into next space, then 3 trebles, 2 chain 3 trebles into next space to make the first corner of your hexagon. Repeat from * 4 more times. Work 3 trebles into next space, then 3 trebles 2 chain into last space (which will be the same space which you worked into at the start of the round. Slip stitch into top of 3 chain from the start of the round to complete, and fasten off.
And there you have it (I hope!). A nice little hexagon which you can now use for whatever takes your fancy: cushions, throws, bags - the only limit is your imagination. Sadly with me my imagination seems a little limited at the moment, so I'm making a throw!
Monday, 10 September 2012
Starburst cushion love
I've finished the second of my starburst cushions - this one colours on a white background.
I actually started this one before the pale blue background cushion that I had made, but then got over excited about the pale blue, so that one was finished first!
I am planning to post a tutorial for how I made both the Starburst squares shown above and also the Starburst hexagons I mentioned the other day - as soon as I have time!
Anyway, I think I need some more Starburst love!...
Ok time for some facts and figures to break up the crochet love a little!
Yarn used for the white starburst cushion was:
Rowan Pure Wool DK Shade 013 Enamel
Debbie Bliss Cashmerino DK Shade 042 Rose Pink
Debbie Bliss Cashmerino DK Shade 045 Mauve
Debbie Bliss Baby Cashmerino DK Shade 060 Hot Pink
Debbie Bliss Baby Cashmerino DK Shade 010 Lilac
Debbie Bliss Baby Cashmerino DK Shade 069 Lilac Pink
Sublime Baby Cashmere Merino Silk DK Shade 002 Cuddle
Phew, didn't realise how many colours I had used!
I used a 4mm hook. The white starburst cushion is slightly larger than the blue one, it was made for a larger cushion pad so each side consists of 25 squares (it was 16 for the blue cushion)
Well that's all for now folks, hope you enjoyed all the colours!
I actually started this one before the pale blue background cushion that I had made, but then got over excited about the pale blue, so that one was finished first!
I am planning to post a tutorial for how I made both the Starburst squares shown above and also the Starburst hexagons I mentioned the other day - as soon as I have time!
Anyway, I think I need some more Starburst love!...
Ok time for some facts and figures to break up the crochet love a little!
Yarn used for the white starburst cushion was:
Rowan Pure Wool DK Shade 013 Enamel
Debbie Bliss Cashmerino DK Shade 042 Rose Pink
Debbie Bliss Cashmerino DK Shade 045 Mauve
Debbie Bliss Baby Cashmerino DK Shade 060 Hot Pink
Debbie Bliss Baby Cashmerino DK Shade 010 Lilac
Debbie Bliss Baby Cashmerino DK Shade 069 Lilac Pink
Sublime Baby Cashmere Merino Silk DK Shade 002 Cuddle
Phew, didn't realise how many colours I had used!
I used a 4mm hook. The white starburst cushion is slightly larger than the blue one, it was made for a larger cushion pad so each side consists of 25 squares (it was 16 for the blue cushion)
Well that's all for now folks, hope you enjoyed all the colours!
Subscribe to:
Posts (Atom)


.jpg)