Wednesday 24 April 2013

Pastel projects

I am having a serious pastel moment right now, and loving it. I'm not normally a pastel person when it comes to colours for clothes, crochet projects or anything really! I usually gravitate to brighter richer colours.

However, I have been really taken with some pastel yarn colours that I have seen in shops and the ways in which they appear when combined with other pastel colours. 

I thought I'd share some of my pastel-love with you!


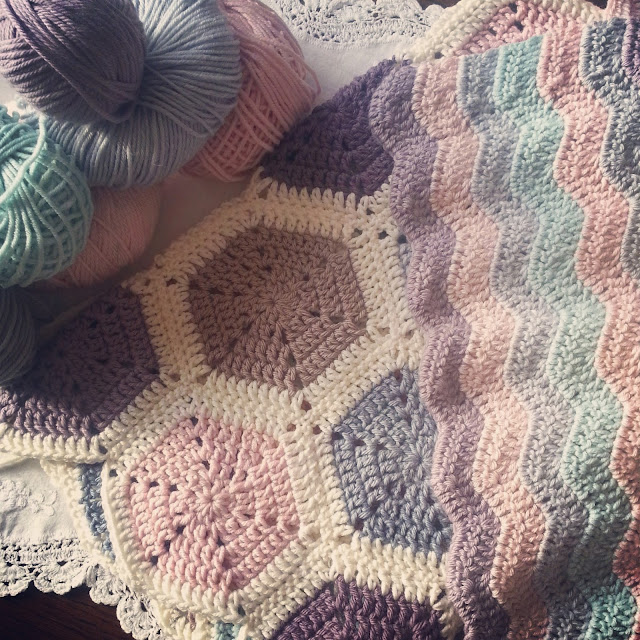
At the moment I have 2 pastel projects on the go, both using the same yarn shades. The hexagons you can see are the start of a small blanket.


The ripple stitch item shown is for a cushion cover. This is the same pattern as I made earlier in the year, and ever since finishing my earlier ripple cushion I have just been itching to see what a pastel version would be like!


I think of the shades I have chosen as 'edgy pastels', particularly for the cushion cover. I think the colours I have used together have managed to not look too girly (I think pastels have a bit of a reputation for being girly and cutesy). I'm attributing their slight edge, and sophistication to the inclusion of some grey and silver-blue shades alongside the more traditional pastel shades of duck egg, pale pink and lilac.

I'm really loving making these items and can't wait to share the finished products with you! The hexagons for the throw are my own pattern, and I hope to have time to share this through a tutorial soon!

xx xxx xx xxx xx xxx xx xxx xx xxx xx xxx xx


Follow on Bloglovin

Sunday 21 April 2013

Canal walk

On Saturday we had such lovely weather, S and I decided it would be perfect for a walk. 

For a while we've been planning to walk along Regent's Canal, but the bad weather has put us off. Now that spring seems to have arrived to stay, we were able to walk the route we had planned weeks ago.


We started at Angel, Islington, and headed down the canal tow path. The sun was shining and there were some lovely blossom trees. I couldn't resist frequent stops to take pictures, which I'm afraid added rather to the length of the walk!


We also stopped along the tow path to watch one of the locks in operation as two canal boats passed through.


As you can see there was so much sunlight that a few of my pictures came out rather over-exposed! Still, it was lovely to feel the sun's warmth on our faces again after such a long, cold winter.


The walk took us through Shoreditch, Bethnal Green and Mile End. We passed parks, industrial areas, back gardens and many many colourful houseboats - even one with a tea room inside (sadly not open when we passed) and one selling second hand books from the deck!


After about 2 hours and 4 miles of walking, we made it to Limehouse Basin, and stopped off at a lovely pub, The Grapes. The Grapes has a little terrace at the back which overlooks the river Thames - the view from the terrace shown in the pictures above.

We sat basking in the sun, enjoying some cold drinks and the sound of the waves lapping against the shingle.


 It was definately the best day of the year so far!

Hope you enjoyed your weekend too!

xx xxx xx xxx xx xxx xx xxx xx xxx xx xxx xx

Wednesday 17 April 2013

Dear Prudence

Although this blog is now mainly about crochet projects, I was a knitter long before I learnt to crochet. And, occassionally, I still like to get my knit on!


Over the past couple of weeks I have been knitting up a sweater, from a pattern called Prudence from the Kim Hargreaves book Amber. I have used Rowan Baby Merino Silk DK yarn. The Bamboo yarn used in the original pattern has long since been discontinued, and besides, it was a horrid yarn! I remember washing my first Prudence, made using that yarn, to find that it grew seemingly inches in every dimension, becoming unwearable!


I love this pattern - this is the third time I have made it now. This time I decided to try and modify the sleeves a little. The sleeves in the original pattern were a little too pouffy for my liking, a bit too over the top. I decided to try for something more subtle.


I am pretty pleased with the finished result. The sleeves still appear wider at the bottom - they are not close fitting around the wrist and lower arm, but they are much less pouffy than they were!


My modifications were as follows, for anyone interested.

Cast on 71 stitches. Work 4 rows in stocking stitch, followed by 2 rows in reverse stocking stitch, 6 rows stocking stitch and another 2 rows reverse stocking stitch. This retains some of the reverse stocking stitch design detail that was originally present in the sleeve design. Then work straight in stocking stitch until the sleeve measures 40 cm. Now simply follow the raglan shaping instructions as given in the original pattern.

For the cuff, at the cast on edge of each sleeve, pick up and knit 71 stitches (with the right side facing), using 3.25mm needles. On the next row, work knit 1, knit 2 tog, *knit 2, knit 2 tog. Repeat from * to last 3 stiches, then knit 3. Work in garter stitch for another 5 rows.


At the moment, I mainly follow blogs and Instagram accounts of other people who crochet. However, lately I have seen some of these people begin to branch out into knitting. I did it the other way around, and I have to say that some aspects of crochet (such as the way to hold the hook etc) came much more naturally to me than the equivalent aspects of knitting did (not that I am brilliant at crochet - I still struggle with some things!).


However, I still remember the difficulty I had in grasping the basics of crochet (especially working in rounds and turning chains at ends of rows!), and I imagine the experience is similar for those learning to knit. Well, if you are a crocheter learning to knit, and reading this, all I can say is - Don't Give Up! You will get there in the end and it will feel fantastic to have mastered a new skill.

xx xxx xx xxx xx xxx xx
Follow on Bloglovin

Thursday 11 April 2013

Colour me happy?


Yes, today's post is starting with a big pile of colourful yarn! I can certainly think of worse ways to begin!

The above stash of Stylecraft Special DK has been lurking in my house for a while now - maybe 6 months or so.

It has been niggling me, in a not unpleasant way - it's nice to think you have a heap of yarn ready and waiting to be transformed into something bright and happy.

The niggling part was, what should I do with it?

On Sunday, I finally decided. It was destined to become a many-coloured blanket. Yup, I know, it's hardly original for me, but there you go. That was what I knew I wanted to make, and so I made a start.


I have been thinking a lot about colour this week. I discovered the brilliant A creative being blog last weekend, and have been entranced by the wonderful Weekly Mandalas shown there - so many variations in colour! I felt really inspired to try and experiment with colours and this big stash of Stylecraft seemed like the perfect opportunity. 

I decided on little granny squares, with 3 colours each and a cream border.

At first I struggled to come up with colour combinations for my little granny squares which I liked with this yarn.

 I'm going to sound like a yarn snob now, but.... part of the reason I have had this Stylecraft for so long is because I always struggle to put the colours together in a way that seems satisfactory to me. Here comes the yarn snobbery....I've wondered if it was something to do with the way the 100% acrylic fibres of the yarn take the dye colours - the colours of this yarn sometimes seem a little harsh to me, and as if they don't want to go together, but just scream out loud on their own.

I promise I'm really not a yarn snob! I do love this yarn, for the value, softness and yes, the range of colours! 


Well, happily, as you can see, I persevered, and finally something seemed to click! Suddenly I could see many different colour combinations that I loved!

So now I am well on the way to my blanket. Here are some of my favourite colour combinations so far:


I also love the way you can change the look and feel of the squares so much just be altering the proportions of the colours used. In the pairs shown above, square within its pair uses the same colours, but they manage to look quite different just from the colours being ordered differently.

I only have one problem now: I love seeing the colours next to each other so much that I am starting to wonder if I should include the cream border or not?

What do you think? Are you a fan or colour on cream, or do you just go for colour all the way?


Until next time!

xx xxx xx xxx xx xxx xx xxx xx


Follow on Bloglovin

Sunday 7 April 2013

Cathedral Blanket - finally finished!

I am happy! The sun is shining, its the weekend, it feels like spring is finally on the way, and I have finally finished my Cathedral Blanket!


Now, I'm afraid I am going to waffle on about this blanket for a while... thank you for bearing with me (if you do!).

This blanket has a lot of little squares.....342 squares in fact. 

342 little crochet squares, each one is 3 rounds, make using double knit (or 8 ply) yarn on a 3.5mm hook.

In total I think it contains 29 different colours (not counting the black).


I used 1 ball of most of the colours - that was enough for the colours that have the longest diagonals. 

Some of the colours in the corners I only used scraps of. This worked out well as I managed to arrange the colour sequence so that I used colours I loved but only had scraps of in the top right and bottom left corners.


I used 7 balls of black yarn for the seams and edging. I devised the edging pattern myself, so had a little trouble going around the corners with it (it didn't quite fit perfectly with the number of stitches, but never mind, I don't think you can tell now).

Yarns used were a bewildering array of different makes and fibres. In terms of different brands, the blanket is mainly Debbie Bliss Cashmerino and Rowan Pure Wool DK with a bit of Sublime Extra Fine Merino thrown in, and a few other things that I can't recall - as I said I have used scraps up where I could, and some of those scraps had long since parted company with their labels!

Fibres used included:

Merino wool...
Cashmere...
Micofibre...
Silk...
...And probably a few others!


You can probably tell, I am very pleased with this blanket. I just have to look at it and I think "happy, happy, happy!"

Hope you're all having a blissful Sunday too!

xoxoxoxoxoxoxoxox

Follow on Bloglovin

Wednesday 3 April 2013

Bloglovin

Phew, having a busy evening tonight! Just quickly to say, I am now on Bloglovin!


I hope to see you there, I know I am looking forward to keeping up to date with all my favourite blogs there!


xx xxx xx xxx xx xxx xx xxx xx xxx xx xxx xx

Something Pretty - How to make the petals

As I have had a request for help with figuring out the pattern for Something Pretty, and because I haven't been able to find anything like a YouTube clip which describes the kind of stitch required, I thought it would be helpful to put up a few photos of how to do this (or at least, how I did it when making my version) in the hope that it helps anyone getting stuck. I know I was stuck with this for a while there!

Before I go any further however, I need to stress that this is not my pattern. I am simply trying to help people out by explaining how I understood the pattern instructions. If you use this pattern, please credit the designer Millie Makes, and not me.

Here goes...

I am using UK crochet terms below, so if you're in the USA you'll need to translate accordingly.

1. You create your base circle as described in the pattern so that you then have 8 double crochet stitches worked into your ring. You'll be working a petal into each of the 8 double crochet stitches on your first round of petals.


2. For your first petal, chain 3 (counts as your first stitch) then work 4 trebles into the first dc. At the end of your fourth treble, pull the loop up so its nice and big, and remove the hook from the stitch completely.


3. Insert the hook into the top of your 3 chain (or the first of your trebles when you're working the remaining 7 petals in the round).


4. Push your hook through the long loop that you have on your last treble stitch. You now have 2 loops on your hook - the loop where you put the hook back through your first treble (or 3 chain) and the loop where you put the hook back through the loop after the final treble in that petal. Wrap your yarn round the hook like your normally do, and pull through both loops.


That's it! You completed your first petal! Now chain 3 and then repeat the process in the next dc stitch, remembering that now and for all subsequent petals in the round you will work 5 trebles (instead of 3 chain, 4 trebles - you only do that in the first petal of the round).


Blossom petal wrap

I spent my evenings over the Easter weekend working on a wrap for myself. It has been such a cold spring and I am so tired of having to wear my winter coat still, I thought I needed a nice pastel-coloured spring like scarf to snuggle in. Something that wouldn't look or feel too wintry, but would still keep me warm.


So, the blossom petal wrap was born, so-called because the colour used reminds me of cherry blossoms whenever I look at it (lovely spring like thought - the idea behind my wrap was working before I had even finished it).


These cherry blossoms were blooming quietly away in Wapping on Sunday. The colour really is very similar - that very delicate sort of pink.


The stitch I used also reminds me of flower petals. Its called Iris Stitch, from The essential handbook of crochet stitches. The yarn I used is a 4 ply pure merino wool, with a 4mm hook so that the stitches were quite open, and like the grey scarf I made last week, the finished wrap is soft and drapey. 


To finish the wrap off, I worked a round of double crochet (that's single crochet if you're in the USA) around the edge, just to give it that finished look. I didn't want a fancy edging, I think the main stitch is pretty enough to speak for itself. 


xx xxx xx xxx xx xxx xx xxx xx xxx xx xxx xx

Monday 1 April 2013

March

So March is done with now too. With the clocks going forward yesterday we're now officially in British Summertime (at least in theory!)


Before I sat down to do this post and compile pictures for it, I felt as though I hadn't really done very much in March. However, now as I look back at all the projects I have worked on, documented in photos, I can see that once again I have managed to pack quite a lot in.

 I've nearly managed to complete a whole blanket (the cathedral blanket), done some sewing, made a scarf and come up with numerous ideas for other projects!

I also have some ambitious plans for April, to try and challenge myself a little bit. I'll explain more in my next post.


I hope you've all had a Happy Easter, and if you're in the UK, I hope you enjoy the rest of your Bank Holiday!

xx xxx xx xxx xx xxx xx xxx xx xxx xx