Sunday 22 April 2012

Granny square love affair

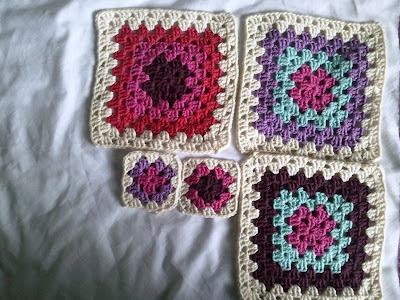
I decided that I will be making a throw, but as it would take me until kingdom come to make an entire throw from the small granny squares that I had started off with, I decided that the main central panel of the throw will be made of strips of larger granny squares, with the smaller squares forming a border to the throw. Needless to say, this is still going to take some time (and a lot of yarn), and will be a labour of love, but I'm determined to finish it!

I'm in the mood for bright colours at the moment, so I'm using clashing shades - I have a turqoise, burgundy, violet, bright pink and a pinky red, with pale cream to form the border for all the squares.

Here are some of the first larger size squares:

A large size square


Larger squares with small border squares

This is my first time making granny squares, and its so much fun and so easy I can't believe I have never tried it before! I can now see a large proportion of my more than ample stash being disposed of in the form of granny squares for various purposes. I have already (somewhat rashly) promised my mother a throw using green and cream yarn which I have stashed - and I haven't even got half way through this project yet!

I'll keep posting my progress with stitching and crocheting here. I expect this will keep me busy for several months, in between other projects!

Friday 20 April 2012

Granny squares

After a couple of weeks of frantically trying to finish my latest assignment, I finally have a chance to relax.

I'm celebrating by making as many of tbese granny squares as I can in 1 weekend! At the moment they are destined for a throw, but we'll see.


Sunday 8 April 2012

Seafish jewellery set

Occassionally I take a detour from knitting into jewellery making - only very simple stuff.

This weekend was one of those occassions. At this time of year, when summer is just around the corner (although you wouldn't know it from the weather here at the moment), I always start thinking of the sea, and its creatures. I have a bit of a fascination with marine creatures and life, especially starfish and shells. They seem magical to me. I used to love collecting sea shells on the beach on family holidays as a kid (I still do it now if I get the chance!). Those sea shells washed up and empty seemed so mysterious, symbols of an unknown world that we can never do more than glimpse.

So, after a visit to my favourite Covent Garden bead shop on Friday, I had the materials for a couple of simple silver necklaces and a pair of earrings. Here's what I have so far:


As you can see these are very simple really - all I had to do was thread the pearls onto a silver head pin, and then turn and wrap the end of the wire to make a loop and secure it so that I could use a jump ring to thread it onto a length of silver chain, or the loop for the fish hook earrings. It seemed appropriate to cluster the pearls and charms togther for a charm necklace - almost like they've been washed up together in a rock pool or on the tide line. However, the loop which the necklace chain threads through is large enough so that I can slip the charms individually off the chain, so I can mix and match depending on my mood. I have a second chain which I can use to thread some of the charms onto, so I could layer 2 necklaces together if I wanted to.
 

Sunday 1 April 2012

Sunset stripy cushion cover

I've been making a stripy cushion cover in aran weight wool cotton. I wanted to try reverse stocking stitch with a stripe pattern. The way the colours are broken up using this just when knitting simple stripes is quite stunning: it reminds me of a sunset.


The cushion fits a 16 inch cushion pad. Here's what I did:

Needles: 4mm for rib band, 4.5mm for main body of cushion
Yarn: Rowan Belle Organic Aran wool cotton:
White: 2 balls
Pink: 2 balls
Aubergine: 2 balls

Front:

Cast on 80 stitches, and knit in stocking stitch in any random stripe pattern you like. The reverse stocking stitch has the best effect in breaking up the colour if you alternate between wide bands of colour and narrow stripes, especially around changing colours. When I wanted to change from one colour to another, I worked as many rows as I liked of colour A, then 1 row of colour B, another 2 rows of colour A then a wide band of colour B again. The point wasn't to plan out how I was going to do the stripes beforehand, I just had fun changing when it seemed right. It was easy to match up the stripes when working the back.

Back: Work 2 pieces for envelope opening.

Piece 1
Cast on 80 stitches working in stripe pattern in reverse stocking stitch so that your work matches the front of your cover. Continue until piece measures approximately 8.5 inches. Using whichever of your three colours you like (I choose white) now work 16 rows of rib as follows:
Row 1 knit 2, purl 2, repeat until end of row. Cast off.

Piece 2

Cast on 80 stitches, working in reverse stocking stitch stripe pattern again, ensuing work matches from of cushion and continue until work measures 8.5 inches. Using the same colour as before, work in rib as before for 8 rows.
Work 5 button holes evenly spaced across rib band by casting off 3 stitches for each button hole. On following row, when you reach the point where you cast off 3 stitches in previous row, wrap yarn around needle 3 times, to make up to correct number of stitches.
Work a further 6 rows in rib, cast off.

Assemble cover and stitch together to form envelope, ensuring that back pieces overlap correctly so that button holes are on the uppermost flap. Stitch on buttons.